


xsukax AES-256 File Encryptor/Decryptor
Build Your Own AES-256 File Encryption System for Maximum Data Security
In an age where data breaches and privacy concerns dominate headlines, protecting your sensitive files has never been more critical. This tutorial will guide you through setting up and using a powerful AES-256 encryption tool that runs entirely in your browser – no installations, no servers, no data leaving your computer. You’ll learn not just how to use it, but understand the cryptographic principles that keep your files secure.
What You’ll Learn: By the end of this tutorial, you’ll understand military-grade encryption, know how to protect any file with unbreakable security, and grasp the mathematical principles that make modern cryptography possible. Time commitment: 15-20 minutes. Difficulty: Beginner-friendly with advanced explanations.
Download Android APK: https://github.com/xsukax/xsukax-AES-256-File-Encryptor-Decryptor-Frontend/raw/refs/heads/main/xsukax_AES256.apk
APK Scan Results with Virus Total: https://www.virustotal.com/gui/file/92fc4f777c2784c35eecf934dc0d07293f53108d9b761384612ac4410fd48e5b
APK Generated By: https://github.com/xsukax/xsukax-Custom-Tabs-APK-Builder
Phase 1: Understanding Encryption Fundamentals
1. Understand What AES-256 Encryption Actually Is
Before you start encrypting files, it’s crucial to understand what you’re working with. AES stands for Advanced Encryption Standard, and it’s the same encryption algorithm used by governments, banks, and military organizations worldwide. The “256” refers to the key length in bits – essentially, it means there are 2^256 possible keys (that’s a 78-digit number).
To put this in perspective, if every computer on Earth tried one trillion keys per second, it would still take billions of times the age of the universe to crack a single AES-256 encrypted file through brute force. This is what security experts call “computationally infeasible” – it’s not just difficult, it’s effectively impossible with current technology.
The encryption works by taking your file (any file – documents, images, videos, databases) and scrambling it using a mathematical algorithm combined with your password. Without the correct password, the encrypted file appears as random noise with no discernible patterns or structure. This is fundamentally different from password-protecting a ZIP file or hiding a folder – those methods can often be bypassed. True AES-256 encryption cannot.
2. Recognize Why Client-Side Encryption Matters
You will notice that this encryption tool runs entirely in your web browser using JavaScript. This is a critical security feature, not a limitation. Here’s why this matters: when you use cloud-based encryption services, you’re trusting that company with your data. Your unencrypted file gets uploaded to their servers, encrypted there, then sent back to you. During this process, the service provider has access to your original file.
With client-side encryption, the mathematics happen on YOUR computer. Your file never leaves your device in unencrypted form. No servers see your data, no logs are created, and no one – not even the tool’s creator – can access your files. The Web Crypto API that powers this tool is built into modern browsers and uses the same cryptographic libraries that power secure websites (those with the padlock icon).
This approach respects the principle of “zero-knowledge security” – the best encryption tools are the ones that can’t access your data even if they wanted to. You maintain complete sovereignty over your information.
3. Access the Encryption Tool
Navigate to the GitHub repository at https://github.com/xsukax/xsukax-AES-256-File-Encryptor-Decryptor-Frontend to access the tool. You will see a single HTML file that contains the entire application – no external dependencies, no complex installations, just pure, auditable code.
You have two options for using this tool: either download the index.html file to your computer and open it directly in your browser (Chrome, Firefox, Safari, or Edge all work perfectly), or if you prefer, you can access it through the xsukax.com website. I personally prefer the downloaded version because it works completely offline – you can encrypt files even without an internet connection, which adds another layer of security.
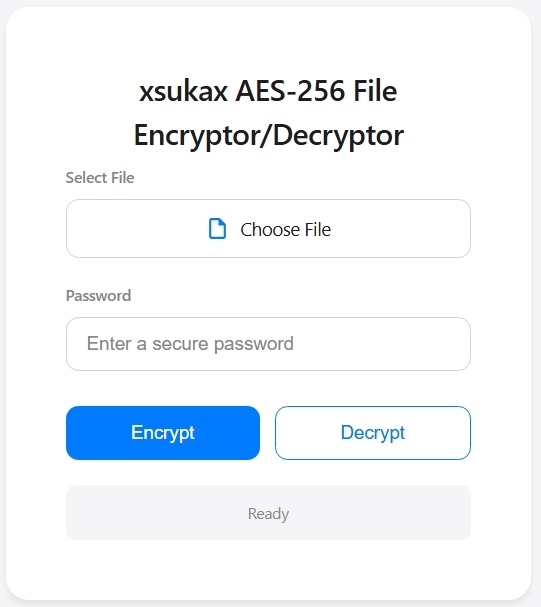
When you open the file, you will see a clean, minimalist interface with an Apple-inspired design. This simplicity is intentional – encryption tools should be straightforward to use. The interface shows three main elements: a file selector, a password input field, and two buttons for encryption and decryption.
4. Examine the Interface and Understand Each Component
The interface is deliberately minimalist to reduce confusion and errors. At the top, you will find the file selection area with a “Choose File” button. This is where you’ll select any file from your computer that needs encryption. The tool accepts absolutely any file type – text documents, PDFs, images, videos, spreadsheets, databases, even executable files. The encryption process doesn’t care about file types; it treats everything as raw binary data.
Below that, you will see the password input field. This is arguably the most critical component because your password’s strength directly determines your security. The tool requires at least 8 characters, but longer is always better. The password never appears on screen (it shows as dots or asterisks), and it’s never stored anywhere – it exists only in your browser’s memory during the encryption/decryption process, then gets immediately discarded.
The two buttons – “Encrypt” and “Decrypt” – perform the core operations. The blue “Encrypt” button scrambles your file, while the white “Decrypt” button reverses the process. Between these buttons and below them, you will find status indicators that show progress bars, success confirmations, or error messages. These provide real-time feedback so you always know what’s happening.
Phase 2: Encrypting Your Files Securely
5. Select Your File for Encryption
Click the “Choose File” button and navigate through your computer’s file system to select the file you want to protect. When you select a file, you will notice the button changes appearance – it gains a subtle blue border and displays your filename (truncated if it’s very long). This visual feedback confirms your selection.
Choose your first file carefully for learning purposes – I recommend starting with a non-critical document like a text file or an image. This lets you experiment with the encryption and decryption process without risking important data. You can always encrypt your crucial files once you’re comfortable with how everything works.
The file size doesn’t significantly impact the encryption process for most normal files. Whether it’s a 10KB text document or a 100MB video, the tool handles it efficiently using your browser’s native cryptographic functions. However, extremely large files (several gigabytes) might take longer to process and could potentially cause browser memory issues on older computers.
6. Create a Strong, Memorable Password
Now comes the critical decision that will determine whether your encryption is truly secure or just security theater. Click into the password field and consider these password principles carefully: Length beats complexity. A password like “correct-horse-battery-staple-mountain-river” is far stronger than “P@ssw0rd!” even though the second one has special characters.
The tool enforces a minimum of 8 characters, but I strongly recommend at least 16 characters for anything sensitive. Here’s why: each additional character exponentially increases the password’s strength. A 16-character password with just lowercase letters and numbers has more possible combinations than an 8-character password with the full character set (uppercase, lowercase, numbers, special characters).
Consider using a password manager like Bitwarden, KeePass, or 1Password to generate and store a truly random password for your encrypted files. These tools can create passwords like “Xk9$mP2#vL8@nQ5&rT3^” that would take quadrillions of years to crack. Write this password down physically and store it somewhere secure – if you lose this password, your encrypted file is permanently unrecoverable. Not even the NSA could decrypt it without the password.
7. Initiate the Encryption Process
With your file selected and a strong password entered, click the blue “Encrypt” button. You will immediately see the interface spring into action. The progress container appears with an animated slide-down effect, showing a progress bar that fills from left to right. The status text changes to “Encrypting…” and you will see a percentage counter updating in real-time.
Here’s what’s actually happening behind the scenes during these few seconds: Your browser first generates a random 16-byte salt (a random value that ensures identical files encrypted with the same password produce different outputs) and a 12-byte initialization vector (IV). These random values are cryptographically secure, meaning they’re generated using your computer’s hardware random number generator, not a predictable algorithm.
Next, your password gets transformed through a process called PBKDF2 (Password-Based Key Derivation Function 2) with 200,000 iterations. This means your password gets hashed 200,000 times combined with the salt to produce the actual encryption key. This process serves two purposes: it transforms passwords of any length into a fixed 256-bit key, and it makes password cracking attempts extremely time-consuming. Even with a somewhat weak password, an attacker would need to perform 200,000 hash operations for each guess attempt.
8. Download and Verify Your Encrypted File
When the progress bar reaches 100%, you will see a download dialog appear automatically. Your browser is offering to save the encrypted file. Notice that the filename has “.enc” appended to it – so “document.pdf” becomes “document.pdf.enc”. This extension helps you identify encrypted files later, though it’s just a convention and doesn’t affect the encryption itself.
Save this encrypted file wherever you want – cloud storage, external drives, email it to yourself, or upload it to public file-sharing sites. The beauty of strong encryption is that the file’s location doesn’t matter. Even if someone intercepts this file, it’s just random-looking binary data without your password. You could publish it on a public website and your data would still be completely secure.
After the download completes, you will see the status message change to green with “File encrypted successfully” displayed. The progress bar smoothly disappears, and the interface returns to its ready state. Your original file remains untouched on your computer – the encryption tool creates a new encrypted copy rather than modifying the original. I recommend keeping both versions temporarily until you’ve verified the decryption works correctly.
Phase 3: Decrypting and Recovering Your Files
9. Select Your Encrypted File for Decryption
To decrypt a file, click “Choose File” again and this time select a file with the “.enc” extension. You will notice the interface performs a validation check – if you try to decrypt a file that doesn’t end in “.enc”, the tool will display a modal popup warning: “Please select an encrypted file (.enc)”. This prevents accidentally attempting to decrypt unencrypted files, which would result in corrupted garbage data.
This validation is a simple but important safety feature. The tool checks only the file extension, not the actual file contents, so technically you could rename any file to add “.enc” and the tool would attempt to decrypt it. However, the decryption process itself will fail if the file wasn’t actually encrypted with this tool, because the mathematical signature won’t match.
10. Enter Your Decryption Password Exactly
Click into the password field and type the EXACT same password you used for encryption. This is where password managers prove invaluable – copy-paste eliminates the risk of typos. If you typed the password manually during encryption, you need to type it exactly the same way now. Passwords are case-sensitive, so “Password123” and “password123” are completely different keys.
There’s no “forgot password” option, no recovery mechanism, and no backdoor. This is a feature, not a bug – it’s what makes the encryption trustworthy. If password recovery existed, that recovery mechanism would be a security vulnerability that attackers could exploit. The trade-off is that you bear the responsibility of password management.
Before clicking decrypt, double-check your password. Consider the Caps Lock key status, ensure you’re not accidentally including spaces before or after the password, and verify you’re using the correct keyboard layout if you use multiple languages. One incorrect character means decryption will fail.
11. Execute the Decryption Process
Click the white “Decrypt” button. You will see the same progress animation as encryption, but this time the status text reads “Decrypting…”. The process happens in reverse: the tool first reads your encrypted file and extracts the salt and IV from the beginning of the file (remember, these were embedded during encryption).
Using your password and the extracted salt, the tool regenerates the encryption key through the same PBKDF2 process with 200,000 iterations. If your password is correct, this regenerated key will be identical to the original encryption key. The tool then uses this key along with the IV to decrypt the remaining file data using the AES-GCM algorithm.
AES-GCM includes authentication, which means the algorithm can detect if the encrypted data has been tampered with. If someone modified even a single bit in your encrypted file – whether accidentally through corruption or intentionally through an attack – the decryption process will fail with an authentication error. This provides integrity verification in addition to confidentiality.
12. Retrieve and Verify Your Original File
When decryption succeeds, your browser automatically prompts you to download the decrypted file. Notice that the filename has the “.enc” extension removed automatically – “document.pdf.enc” becomes “document.pdf” again. Save this file and open it with the appropriate application to verify it’s intact and unchanged from the original.
This verification step is crucial, especially when you’re first learning the system. Open the decrypted file and confirm it’s identical to what you encrypted. Check a PDF renders correctly, an image displays properly, a video plays without corruption, or a document contains all its original content. The encryption and decryption process is lossless – no data degradation occurs, and the decrypted file should be byte-for-byte identical to the original.
If decryption fails, you will see a modal popup stating “Decryption failed. Please check your password.” This happens for two reasons: either your password is incorrect, or the encrypted file has been corrupted or tampered with. The tool cannot distinguish between these scenarios because doing so would leak information about the encryption. Try the password again, and if you’re certain it’s correct, the file itself may be damaged.
Phase 4: Advanced Understanding and Best Practices
13. Understand the Cryptographic Implementation Details
Let’s dive deeper into how this tool actually implements AES-256-GCM encryption. The tool uses the Web Crypto API, which is a standardized JavaScript interface to cryptographic operations built directly into modern web browsers. This API provides access to the same cryptographic primitives used for HTTPS connections and other security-critical functions.
The encryption mode is AES-GCM (Galois/Counter Mode), which is currently considered the gold standard for authenticated encryption. GCM mode provides both confidentiality (attackers can’t read your data) and authenticity (attackers can’t modify your data without detection). This is superior to older modes like CBC or ECB which provided only confidentiality.
The key derivation uses PBKDF2-SHA256 with 200,000 iterations. PBKDF2 is designed specifically for password-based encryption and is endorsed by NIST (National Institute of Standards and Technology). The 200,000 iteration count follows current security recommendations – higher than the older 10,000 iteration standard but not so high that encryption becomes annoyingly slow. As computers get faster, this iteration count can be increased in future versions for better security.
The salt (16 bytes) and IV (12 bytes) are both generated using crypto.getRandomValues(), which accesses the operating system’s cryptographically secure random number generator. This is critical – predictable random numbers would completely undermine the encryption’s security. The salt ensures identical files encrypted with the same password produce different encrypted outputs, preventing frequency analysis attacks. The IV ensures that encrypting the same file multiple times with the same password still produces different ciphertexts.
14. Implement Strong Password Practices and Key Management
Your password is the single point of failure in this entire system. No matter how mathematically strong AES-256 is, a weak password renders it useless. Here are advanced password strategies: Consider using Diceware passphrases – roll physical dice to select words from a list, creating passwords like “clover-cement-laptop-frozen-harvest-dynamic”. Six random words provide approximately 77 bits of entropy, which is cryptographically strong.
For maximum security files, use a password manager to generate a completely random 32+ character password mixing uppercase, lowercase, numbers, and symbols. Store this password in your password manager’s database, which is itself encrypted with a master password. This gives you multiple layers of security.
Never reuse encryption passwords across different files if those files have different security requirements. If you encrypt both your tax documents and your recipe collection with the same password, compromising the recipe password compromises your tax documents too. Password managers make managing multiple unique passwords practical.
Consider the lifetime of your encrypted data. Files you need to decrypt frequently might use a password you’ve memorized. Files you’re archiving for years might use a generated password stored in multiple secure locations – your password manager, a physical note in a safe deposit box, and a sealed envelope with a trusted person.
15. Apply Strategic File Encryption Scenarios
Understanding WHEN to encrypt is as important as knowing HOW to encrypt. Use encryption strategically for: Financial documents (tax returns, bank statements, investment records) – these contain personally identifiable information that could enable identity theft. Legal documents (contracts, wills, medical records) – sensitive information that should remain confidential. Personal communications (private letters, diary entries, sensitive emails) – protect your privacy even from cloud service providers.
Backup encryption is particularly powerful: before uploading backups to cloud storage like Google Drive, Dropbox, or OneDrive, encrypt them first. This gives you the convenience of cloud storage with zero-knowledge security. Even if the cloud provider gets breached or compelled by law enforcement, your encrypted files remain protected.
For collaborative scenarios, both parties need the password. Share encryption passwords through a different channel than the encrypted file – if you email someone an encrypted file, send the password via text message or in-person conversation. This separation prevents a single compromised communication channel from exposing both the file and its key.
Don’t encrypt files unnecessarily – encryption adds a layer of complexity and the risk of password loss. Regular photos, music files, or public documents don’t need encryption. Reserve encryption for genuinely sensitive data where confidentiality matters.
16. Troubleshoot Common Issues and Edge Cases
If encryption fails immediately, check that you’ve actually selected a file and entered a password. The tool validates these inputs before attempting encryption. If encryption starts but fails mid-process, you may be dealing with browser memory limitations – try a smaller file or use a desktop browser instead of mobile.
If you can select an encrypted file but decryption fails even with the correct password, the file may be corrupted. This can happen during file transfer – always verify file integrity after moving encrypted files between systems. Compare file sizes, or use checksums if you’re technically inclined. Even a single corrupted byte will cause decryption failure due to GCM authentication.
Browser compatibility issues are rare but possible. This tool requires a modern browser with Web Crypto API support – Chrome 37+, Firefox 34+, Safari 11+, or Edge 79+. Internet Explorer does not support Web Crypto and cannot run this tool. If you experience issues, ensure your browser is updated to a recent version.
The password field might autocomplete with saved passwords from your browser’s password manager. Be cautious here – make sure you’re using the password you actually encrypted with, not a different saved password. Clear the autocomplete and type/paste your password deliberately.
17. Practice Safe File Management Workflows
After successfully encrypting a file, establish a workflow: First, decrypt the file immediately as a test to verify your password works. Then, secure your password using a password manager or physical documentation. Only after confirming successful decryption should you delete the original unencrypted file (if that’s your intention).
Consider versioning for important encrypted files. If you update a document regularly, you might maintain multiple encrypted versions: “taxes-2024-v1.enc”, “taxes-2024-v2.enc”, etc. This protects against the rare scenario where an encrypted file gets corrupted during editing.
For absolute maximum security, encrypt files on an air-gapped computer (one never connected to the internet), transfer the encrypted file via USB drive, then upload that encrypted file from a different computer. This eliminates the theoretical risk of malware capturing your password during the encryption process. This is overkill for most users but appropriate for genuinely classified information.
18. Explore Advanced Cryptographic Concepts
Now that you’ve mastered practical encryption, consider learning more about the underlying mathematics. AES encryption uses substitution-permutation networks – essentially, your data gets scrambled through multiple rounds of mathematical transformations. AES-256 uses 14 rounds of these transformations.
Research the difference between symmetric encryption (like AES, where the same key encrypts and decrypts) and asymmetric encryption (like RSA, where different keys are used for encryption and decryption). Each has appropriate use cases – symmetric is faster and simpler for file encryption, asymmetric enables public key cryptography used in HTTPS and digital signatures.
Explore tools like OpenSSL or GPG for command-line encryption with additional features like digital signatures and key management. These professional tools offer more flexibility but have steeper learning curves. Understanding this browser-based tool gives you the foundational knowledge to approach those advanced tools with confidence.
Conclusion and Next Steps
Congratulations! 😀 You’ve now mastered AES-256 file encryption and understand the cryptographic principles that protect sensitive data worldwide. You can confidently secure any file with military-grade encryption, and more importantly, you understand WHY this encryption works and what makes it trustworthy.
What you’ve accomplished: You’ve learned to encrypt and decrypt files using industry-standard AES-256-GCM cryptography, understood the critical importance of password strength and key derivation, explored the architectural advantage of client-side encryption, and gained insight into the mathematical foundations of modern cryptography.
Where to go from here: Experiment with encrypting different file types to build confidence. Research password management strategies and implement a personal system that balances security with usability. For even deeper security, explore file shredding tools that securely delete original unencrypted files, investigate digital signatures to verify file authenticity, and study end-to-end encryption in messaging apps to see these principles applied to communication.
An honest note: Encryption is only as strong as your password and your management of that password. Technology cannot protect you from writing your password on a sticky note attached to your monitor or using “password123” as your key. The security responsibility ultimately rests with you, the user. Choose strong passwords, store them securely, and understand that losing an encryption password means permanently losing access to that file – this is a feature that ensures security, not a limitation to work around.
The source code for this tool is freely available on GitHub, allowing anyone to audit the implementation and verify there are no backdoors or vulnerabilities. This transparency is fundamental to trustworthy security tools. Feel free to examine the code, learn from it, and even modify it for your specific needs.
Stay secure, protect your privacy, and remember: strong encryption is your fundamental right in the digital age!