


Build Your Secure Call System by xsukax
Build Your Secure Call System by xsukax – إنشئ نظام الإتصال الآمن الخاص بك
# Build Your Own Secure VoIP Call System: Complete WireGuard Tutorial
Last Updated: January 2026
In an era where privacy concerns dominate digital communication, building your own encrypted communication system offers unprecedented control over your data. This comprehensive guide walks you through creating a private VoIP network using WireGuard VPN technology, enabling secure voice calls, messaging, and file transfers without relying on third-party services that may compromise your privacy.
Why Build Your Own Communication System? {#why-build-your-own}
The Privacy Problem with Commercial VoIP Services
Popular communication platforms like WhatsApp, Signal, and even “encrypted” messaging services have fundamental limitations:
Metadata Exposure: While message content may be encrypted, metadata (who you call, when, for how long, your location) remains visible to service providers and potentially government agencies. This metadata alone reveals significant information about your personal and professional relationships.
Centralized Infrastructure: Relying on commercial servers means trusting a third party with your communication infrastructure. Server compromises, legal data requests, or policy changes can unexpectedly impact your privacy.
Limited Control: You cannot audit the server-side code, control data retention policies, or customize security parameters to meet specific threat models.
Advantages of Self-Hosted Communication
Building your own system addresses these concerns:
- Complete Data Sovereignty: All traffic flows through infrastructure you control
- Zero Metadata Leakage: No third party can analyze your communication patterns
- Customizable Security: Implement additional security layers based on your needs
- No Account Requirements: No phone numbers, email addresses, or personal information required
- Censorship Resistance: Cannot be blocked by governments or ISPs targeting specific services
- Cost Effective: After initial setup, operational costs are minimal (typically $5-10/month for VPS)
Real-World Use Cases
This system is particularly valuable for:
- Journalists and activists in restrictive jurisdictions requiring censorship-resistant communication
- Business professionals discussing sensitive intellectual property or trade secrets
- Healthcare providers needing HIPAA-compliant communication channels
- Privacy-conscious individuals seeking alternatives to surveillance-based platforms
- Remote teams requiring secure internal communication infrastructure
How This System Works {#how-it-works}
Technical Architecture Explained
Our solution combines three core technologies:
1. WireGuard VPN Protocol
WireGuard is a modern VPN protocol that creates encrypted tunnels between devices. Unlike traditional VPNs designed for internet anonymization, we’re using it to create a private network overlay where devices can communicate as if they were on the same local network.
Key advantages of WireGuard:
- Extremely Fast: Uses state-of-the-art cryptographic primitives optimized for performance
- Simple Codebase: Only ~4,000 lines of code (compared to OpenVPN’s 100,000+), making security audits feasible
- Built-in to Linux Kernel: Native support in Linux 5.6+ ensures optimal performance
- Modern Cryptography: Uses ChaCha20 for encryption, Poly1305 for authentication, and Curve25519 for key exchange
2. PiVPN Automation Script
PiVPN is an open-source installer that automates WireGuard deployment. It handles:
- Package installation and dependencies
- Firewall configuration (iptables/nftables)
- Network routing and NAT rules
- Certificate generation and management
- Client configuration file creation
3. Talkie WiFi Walkie-Talkie App
Talkie is a LAN-based VoIP application that automatically discovers other clients on the same network. When combined with WireGuard, it enables:
- Push-to-talk voice communication
- Text messaging
- File transfers
- All communication encrypted by the VPN tunnel
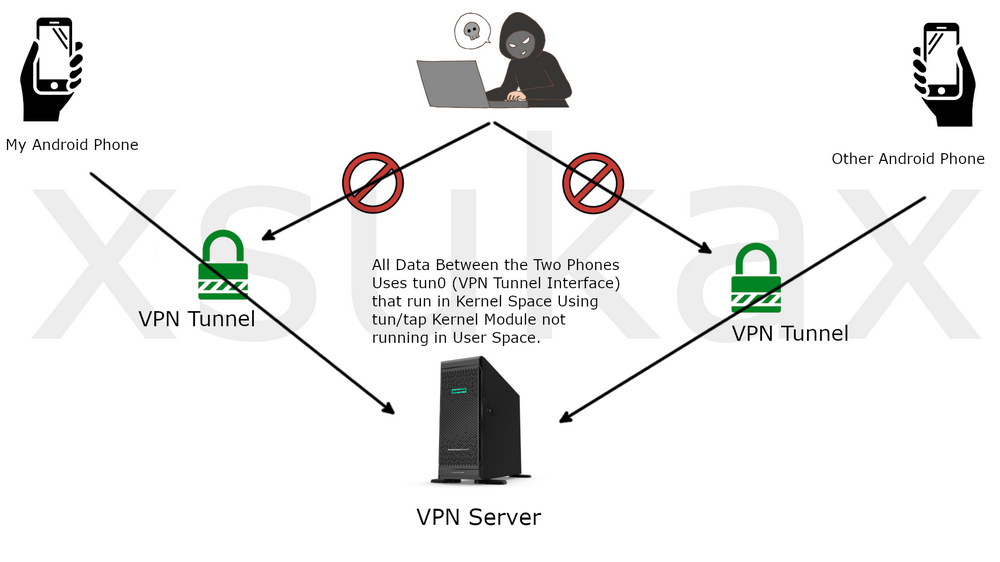
Network Flow Diagram
[Phone A] ←→ [WireGuard Tunnel] ←→ [VPN Server] ←→ [WireGuard Tunnel] ←→ [Phone B]
          Encrypted                                              Encrypted
All voice data travels through the VPN server, encrypted end-to-end by WireGuard’s cryptography. The server acts as a routing hub but cannot decrypt the VPN traffic.
Prerequisites {#prerequisites}
Required Resources
Server Infrastructure:
- Linux VPS (Virtual Private Server) with minimum specifications:
- 1 CPU core
- 512MB RAM
- 10GB storage
- Ubuntu 20.04 LTS, Debian 11+, or similar distribution
- Public IPv4 address
- Recommended providers: DigitalOcean, Vultr, Linode, Hetzner
Alternative: Raspberry Pi 4 (2GB+ RAM) with dynamic DNS service (NoIP, DuckDNS) for home hosting
Client Devices:
- Two or more Android smartphones (Android 5.0+)
- Approximately 50MB free storage per device
Required Knowledge:
- Basic Linux command line navigation
- Understanding of SSH connections
- Basic networking concepts (IP addresses, ports, DNS)
Estimated Time: 45-60 minutes for first-time setup
Cost Breakdown
- VPS Hosting: $5-10/month (DigitalOcean/Vultr standard droplet)
- Domain Name (optional): $10-15/year
- Total First Year: ~$70-135
Architecture Overview {#architecture}
Network Topology
Internet
    │
    ├─── VPS Server (Public IP: x.x.x.x)
    │       ├─── WireGuard Interface (10.8.0.1/24)
    │       └─── Firewall Rules
    │
    ├─── Client 1 (VPN IP: 10.8.0.2)
    │       └─── Talkie App
    │
    └─── Client 2 (VPN IP: 10.8.0.3)
            └─── Talkie App
Each client connects to the VPS server via WireGuard, receiving a private IP address (10.8.0.x). Talkie discovers peers through the VPN interface, enabling direct encrypted communication.
Step-by-Step Implementation {#implementation}
Phase 1: Server Deployment
Step 1: Deploy VPS Instance
Option A: Cloud VPS (Recommended for beginners)
-
Create Account: Register with a VPS provider (DigitalOcean, Vultr, Linode, etc.)
-
Deploy Server:
- Operating System: Ubuntu 22.04 LTS
- Plan: Basic ($5/month tier)
- Datacenter: Choose geographically closest to your users for lower latency
- Authentication: SSH key (more secure than password)
-
Access Credentials: Note your server’s public IP address and root password/SSH key
Option B: Raspberry Pi (More private, requires home network setup)
- Flash Raspberry Pi OS to SD card using Raspberry Pi Imager
- Enable SSH during initial setup
- Configure dynamic DNS service (NoIP, DuckDNS) to obtain a stable hostname
- Set up port forwarding on your router (WireGuard default port: 51820 UDP)
Step 2: Initial Server Security
Before installing WireGuard, secure your server:
# Update system packages
sudo apt update && sudo apt upgrade -y

# Create non-root user
sudo adduser wireguard
sudo usermod -aG sudo wireguard

# Disable root login
sudo nano /etc/ssh/sshd_config
# Change: PermitRootLogin no
sudo systemctl restart sshd

# Enable UFW firewall
sudo ufw allow ssh
sudo ufw allow 51820/udp
sudo ufw enableImportant: Document your non-root username and password securely.
Phase 2: WireGuard Installation via PiVPN
Step 3: Connect to Server
Windows Users: Download and install PuTTY
macOS/Linux Users: Use built-in Terminal
ssh root@YOUR_SERVER_IP
# Or: ssh username@YOUR_SERVER_IP -i /path/to/private_key
Step 4: Run PiVPN Installation Script
PiVPN automates WireGuard setup with a single command:
curl -L https://install.pivpn.io | bashSecurity Note: Piping curl output directly to bash is generally discouraged. For production environments, download the script first, review it, then execute:
curl -L https://install.pivpn.io -o pivpn-install.sh
less pivpn-install.sh  # Review the script
bash pivpn-install.sh
Step 5: PiVPN Configuration Wizard
The installation wizard will guide you through several configuration screens:
Screen 1: User Selection
- Choose the non-root user you created earlier
- This user will own WireGuard configuration files
Screen 2: Protocol Selection
- Select WireGuard (not OpenVPN)
- WireGuard offers superior performance and simpler configuration
Screen 3: Port Configuration
- Default: 51820 UDP
- Recommendation: Keep default unless you have specific requirements
- If changing, ensure firewall rules are updated accordingly
Screen 4: DNS Provider
- Options: Google (8.8.8.8), Cloudflare (1.1.1.1), OpenDNS, Custom
- Recommendation: Cloudflare for privacy-focused DNS resolution
- Note: This affects which DNS servers VPN clients will use
Screen 5: Public IP/DNS Selection
- For VPS: Select your public IP address
- For Raspberry Pi: Select your dynamic DNS hostname
- Clients will connect to this address
Screen 6: Installation Confirmation
- Review settings and confirm installation
- Process takes 5-10 minutes depending on server specs
Step 6: Post-Installation
After installation completes:
# Reboot server to apply changes
sudo reboot

# After reboot, verify WireGuard is running
sudo wg show
# Should display your WireGuard interface configuration
Phase 3: Client Configuration
Step 7: Generate Client Profiles
For each device that will connect to your VPN:
# Generate configuration file
pivpn add

# Enter a name for this client (e.g., "phone1", "phone2")
# Choose a duration (default: 1080 days) or leave blank for indefinite
The configuration file is created at: /home/YOUR_USERNAME/configs/CLIENT_NAME.conf
Best Practice: Use descriptive names (e.g., “eslam-phone”, “partner-tablet”) to track which config belongs to which device.
Step 8: Transfer Configuration Files to Devices
Method 1: SFTP (Secure File Transfer Protocol)
Using FileZilla or similar SFTP client:
-
Connect:
- Protocol: SFTP
- Host: YOUR_SERVER_IP
- Port: 22 (SSH port)
- Username: YOUR_USERNAME
- Password: YOUR_PASSWORD
-
Navigate:
/home/YOUR_USERNAME/configs/ -
Download: Save
.conffiles to your computer
Method 2: Direct Display
# Display QR code in terminal (easier for mobile import)
pivpn -qr CLIENT_NAME

# Or display text content
cat /home/YOUR_USERNAME/configs/CLIENT_NAME.conf
Method 3: Email (Less Secure)
# Email configuration (install mail client first)
sudo apt install mailutils
pivpn -qr CLIENT_NAME | mail -s "VPN Config" [email protected]
Security Warning: Configuration files contain private keys. Transfer them securely and delete from intermediary devices after importing to phones.
Phase 4: Mobile Device Setup
Step 9: Install Required Applications
On each Android device:
-
WireGuard App:
- Install from Google Play Store
- Official app by WireGuard developers
- Open source and regularly audited
-
WiFi Talkie App:
- Install from Google Play Store
- Free version supports basic VoIP functionality
- Alternatives: Linphone, Jami (more features but more complex)
Step 10: Import WireGuard Configuration
Option A: QR Code Import
- Open WireGuard app
- Tap “+” button → “Scan from QR code”
- Scan QR code displayed on server terminal
Option B: File Import
- Transfer
.conffile to device (via USB, cloud storage, email) - Open WireGuard app
- Tap “+” button → “Import from file or archive”
- Select the
.conffile
Option C: Manual Entry (if automated methods fail)
- Open WireGuard app
- Tap “+” → “Create from scratch”
- Enter details from
.conffile manually
Step 11: Activate VPN Connection
- In WireGuard app, locate your profile name
- Toggle the switch to “ON”
- First-time users will see a connection request permission prompt—tap “OK”
- Status should show:
- Latest handshake: A few seconds ago
- Transfer: Some bytes received/sent
Verification:
# On server, check connected clients
sudo wg show

# You should see your peer with recent handshake timestamp
Step 12: Configure Talkie for VPN Network
-
Open Talkie app
-
Grant Permissions:
- Microphone access (required for calls)
- Storage access (for file transfers)
- Nearby devices (for network discovery)
-
Access Network Manager:
- Tap menu icon (☰) → “Network Manager”
-
Configure Network Interface:
- Under “Additional Networks”, you’ll see the WireGuard interface (wg0)
- Tap on it to activate
- Move it to “Active Networks” section
-
Verify Connectivity:
- Return to main screen
- Both phones should now appear in the device list
- Each device shows its VPN IP address (10.8.0.x)
Step 13: Test Communication
Voice Call Test:
- On Phone A, tap Phone B’s name
- Press and hold the large blue button to speak (push-to-talk)
- Release button when finished speaking
- Phone B should hear audio with minimal delay (<100ms on good connections)
Text Message Test:
- Tap device name → “Messages”
- Type and send test message
- Verify instant delivery
File Transfer Test:
- Tap device name → “Send File”
- Select small test file (<10MB)
- Verify successful transfer
Security Hardening {#security}
Essential Security Measures
The basic setup provides strong encryption, but additional hardening is critical for production use:
1. Server Firewall Configuration
Restrict access to essential ports only:
# Allow only SSH and WireGuard
sudo ufw default deny incoming
sudo ufw default allow outgoing
sudo ufw allow 22/tcp    # SSH
sudo ufw allow 51820/udp # WireGuard
sudo ufw enable
2. Fail2Ban Protection
Prevent SSH brute-force attacks:
sudo apt install fail2ban -y
sudo systemctl enable fail2ban
sudo systemctl start fail2ban

# Configure SSH protection
sudo cp /etc/fail2ban/jail.conf /etc/fail2ban/jail.local
sudo nano /etc/fail2ban/jail.local
# Under [sshd] section, set: enabled = true
sudo systemctl restart fail2ban
3. Disable IPv6 (If Not Used)
Prevent IPv6 leak vulnerabilities:
sudo nano /etc/sysctl.conf
# Add these lines:
net.ipv6.conf.all.disable_ipv6 = 1
net.ipv6.conf.default.disable_ipv6 = 1
sudo sysctl -p
4. Regular Security Updates
Enable automatic security updates:
sudo apt install unattended-upgrades
sudo dpkg-reconfigure --priority=low unattended-upgrades
5. WireGuard Key Rotation
Rotate keys periodically (every 6-12 months):
# Generate new keys
wg genkey | tee privatekey | wg pubkey > publickey

# Update server configuration
sudo nano /etc/wireguard/wg0.conf
# Replace PrivateKey with new value

# Restart WireGuard
sudo systemctl restart wg-quick@wg0

# Generate new client configs
pivpn add
6. Monitor Server Logs
Regularly review system logs for suspicious activity:
# Check WireGuard logs
sudo journalctl -u wg-quick@wg0

# Check authentication logs
sudo grep 'authentication failure' /var/log/auth.log

# Check fail2ban activity
sudo fail2ban-client status sshd
Advanced Security: Jump Server Architecture
For maximum security, implement a two-tier architecture:
- Jump Server: Public-facing server with hardened security
- VPN Server: Internal server accessible only through jump server
This prevents direct exposure of your VPN server to the internet.
Troubleshooting {#troubleshooting}
Common Issues and Solutions
Issue 1: WireGuard Connection Fails
Symptoms: No handshake in WireGuard app, status shows “handshake: never”
Diagnosis:
# On server, check WireGuard status
sudo wg show

# Check firewall rules
sudo ufw status

# Verify WireGuard service
sudo systemctl status wg-quick@wg0Solutions:
- Ensure UDP port 51820 is open in server firewall
- Verify server public IP is correct in client config
- Check if VPS provider has additional firewall rules (DigitalOcean Cloud Firewall, etc.)
- Restart WireGuard:
sudo systemctl restart wg-quick@wg0
Issue 2: Talkie Cannot Find Other Devices
Symptoms: Connected to VPN but devices don’t appear in Talkie
Solutions:
- Verify both devices are connected to VPN (check WireGuard handshake)
- Confirm both devices have wg0 interface active in Talkie Network Manager
- Disable battery optimization for Talkie app (Settings → Apps → Talkie → Battery → Unrestricted)
- Check Android permissions (Nearby devices, Location)
- Try pinging other device: Install “Termux” app, ping VPN IP
Issue 3: High Latency or Audio Delay
Symptoms: Significant delay in voice transmission (>200ms)
Diagnosis:
# Test latency from phone to server
ping -c 10 10.8.0.1

# Acceptable: <50ms average
# Poor: >100ms averageSolutions:
- Choose VPS datacenter closer to your physical location
- Upgrade VPS plan if CPU usage is high
- Reduce Talkie audio quality in app settings
- Ensure stable internet connection on both devices (avoid cellular data if possible)
Issue 4: Connection Drops Frequently
Solutions:
- Enable persistent keepalive in WireGuard config:
# Edit client config nano /etc/wireguard/wg0.conf # Under [Peer] section, add: PersistentKeepalive = 25 - Disable Android battery optimization for WireGuard
- Check server load:
htop(install if needed:sudo apt install htop)
Issue 5: “Permission Denied” Errors
Solutions:
- Verify you’re logged in as correct user
- Check file permissions:
ls -la /home/USERNAME/configs/ - Use sudo when required:
sudo pivpn add
Getting Help
If issues persist:
- Check Server Logs:
sudo journalctl -xe - WireGuard Debug:
sudo wg show all - Network Diagnostics:
sudo ss -tulpn(shows listening ports) - Community Support:
- PiVPN GitHub Issues: https://github.com/pivpn/pivpn/issues
- WireGuard Mailing List: https://lists.zx2c4.com/mailman/listinfo/wireguard
- Reddit: r/WireGuard, r/selfhosted
Alternatives Comparison {#alternatives}
WireGuard vs. Other VPN Protocols
| Feature | WireGuard | OpenVPN | IPsec |
|---|---|---|---|
| Performance | Excellent (fast) | Good | Moderate |
| Setup Complexity | Easy | Moderate | Difficult |
| Code Audit | 4,000 lines | 100,000+ lines | Very complex |
| Mobile Battery | Efficient | Moderate drain | High drain |
| NAT Traversal | Excellent | Good | Poor |
| Best For | Modern systems | Legacy compatibility | Enterprise |
Self-Hosted vs. Commercial Solutions
Self-Hosted (This Tutorial):
- ✅ Complete privacy
- ✅ No metadata collection
- ✅ Censorship resistant
- ✅ One-time learning curve
- ❌ Requires technical knowledge
- ❌ Maintenance responsibility
Signal/WhatsApp:
- ✅ Easy to use
- ✅ Large user base
- ❌ Centralized servers
- ❌ Metadata exposed
- ❌ Phone number required
SimpleX Chat:
- ✅ No identifiers required
- ✅ Strong security
- ✅ Decentralized
- ❌ Smaller user base
- ❌ No voice calls (yet)
Recommended Use Cases by Solution
Choose This Tutorial If:
- You need complete control over infrastructure
- Privacy is critical (journalism, activism, sensitive business)
- You have 2-10 trusted contacts requiring secure communication
- You’re willing to invest setup time for long-term benefits
Choose Signal If:
- You need to communicate with many non-technical users
- Convenience is prioritized over maximum privacy
- You trust Signal’s infrastructure
Choose Matrix/Element If:
- You need federation (communication between different servers)
- Text chat is primary use case
- You want self-hosting without VPN complexity
FAQ {#faq}
Q: Is this truly secure against government surveillance?
A: This system significantly raises the bar for surveillance. Traffic is encrypted end-to-end with WireGuard’s strong cryptography, and you control the infrastructure, eliminating third-party metadata collection. However, no system is 100% secure against a determined, well-resourced adversary. Endpoint security (device compromises), traffic analysis, and server location remain potential attack vectors.
Q: How many devices can connect simultaneously?
A: A basic $5/month VPS can handle 10-20 concurrent WireGuard connections comfortably. Performance depends on server resources and bandwidth. For larger deployments (50+ users), upgrade to a higher-tier VPS plan.
Q: Can I use this for regular internet browsing?
A: Yes, by modifying WireGuard configuration to route all traffic through the VPN (full tunnel mode). However, this tutorial configures split-tunnel mode (only VPN network traffic uses the tunnel) for better performance. Edit the AllowedIPs parameter in client configs to enable full tunneling.
Q: What happens if the VPS provider goes down?
A: Communication becomes unavailable until service is restored. For critical applications, implement redundancy:
- Deploy backup VPN server on different provider
- Configure clients with multiple profiles
- Set up monitoring/alerting for server downtime
Q: Is this legal in my country?
A: In most jurisdictions, operating a VPN server for personal use is legal. However, some countries restrict VPN usage. Research local laws before deployment. This tutorial is for educational purposes—you are responsible for ensuring compliance with applicable laws.
Q: Can I add iOS devices (iPhone/iPad)?
A: Yes! WireGuard has an official iOS app. The configuration process is identical to Android. Note: Some VoIP apps on iOS have background limitations—test before relying on it for critical communication.
Q: How much bandwidth does voice calling consume?
A: Talkie uses approximately 30-60 KB/s per active call. A 10-minute call consumes roughly 20-35 MB. This is significantly less than video calling but more than text messaging.
Q: Can I use a free VPS provider?
A: While technically possible, free providers often have limitations:
- Unstable uptime
- Bandwidth restrictions
- Sudden account terminations
- Shared IP addresses (may cause connection issues)
For reliable service, invest in a budget paid VPS ($5/month is affordable and stable).
Q: Do I need a domain name?
A: Not required. You can connect directly to your VPS public IP address. A domain provides benefits:
- Easier to remember
- Can move to different servers without reconfiguring clients
- Looks more professional
Q: How do I backup my configuration?
A: Backup these critical files regularly:
# On server
/etc/wireguard/wg0.conf          # Server config
/home/USERNAME/configs/*.conf     # Client configs

# Download to your computer
scp -r user@server:/etc/wireguard/wg0.conf ~/backup/
scp -r user@server:/home/USERNAME/configs ~/backup/
Next Steps and Advanced Configuration
Once your basic system is operational, consider these enhancements:
- Multi-Factor Authentication: Add 2FA to SSH access
- Monitoring Dashboard: Install Netdata for real-time monitoring
- Automated Backups: Configure cron jobs for configuration backups
- Custom DNS: Run your own DNS server (Pi-hole) on the VPS
- Video Calling: Explore Jitsi Meet for self-hosted video conferences
- Mesh Networking: Connect multiple VPN servers for redundancy
About the Author
This tutorial was created by xsukax, a software developer specializing in privacy-focused applications and network security implementations. With over 100+ open-source projects on GitHub and experience in cryptographic systems, xsukax focuses on empowering users with self-hosted, privacy-respecting alternatives to commercial platforms.
Disclaimer: This tutorial is provided for educational purposes. The author is not responsible for misuse of this information or any legal consequences resulting from deployment in jurisdictions where VPN usage is restricted. Users are responsible for securing their infrastructure and complying with applicable laws.
Keywords: WireGuard VPN, secure VoIP, self-hosted communication, private voice calls, encrypted messaging, Linux VPN server, PiVPN tutorial, privacy-focused communication, Android VPN setup, secure file transfer